You Ask, We Answer: Do you really need to use Bond Breaker Tape?

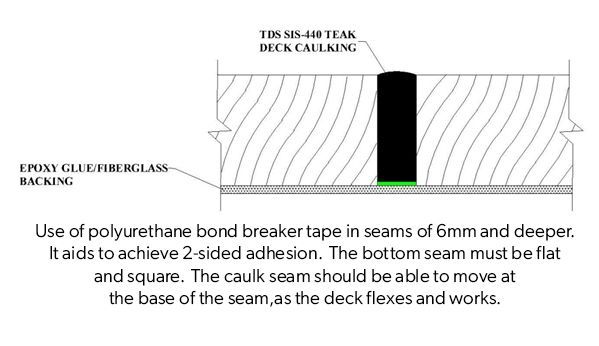
When installed correctly, bond breaker tape plays a crucial role in the performance and longevity of teak deck caulking. It's not just a "nice-to-have" in deeper seams; it's a valuable insurance policy that can prevent costly repairs and improve the durability of your decking.


When Should You Use Bond Breaker Tape?

Our general recommendation is to use bond breaker tape in any seam deeper than 3/16" (5 mm). In practice, we find it even more effective in seams at least ¼" (~6.5 mm) deep. At these depths, the tape replaces traditional cotton by creating a “release” layer at the bottom of the seam. This reduces the adhesive load on the seam walls and helps ensure the caulking adheres only to the sides—where it should.


Teak and Wood expands and contract with changes in weather .

Why It Matters: Movement and Stress in Teak Decks

Teak (and wood in general) expands and contracts with changes in weather: sun, rain, heat, and cold. These movements create significant stress on caulk seams. Without bond breaker tape, even a well-prepped seam can fail under pressure. In some cases, the caulk pulls so hard that it tears the wood when it contracts.


You may notice a concave appearance in seams after a period of dry weather, even if the caulking was originally applied flat. This is a visual indicator of shrinkage and stress. When bond breaker tape is used correctly, the caulk can release cleanly at the bottom, reducing the concave effect and preserving the integrity of the seam walls. Over time, this means fewer repairs and longer-lasting performance.


Choosing the right fine line tape is important. We recommend (and use) Scotch® #218 Fine Line Tape due to its superior adhesive properties and reliability.

Avoiding Pitfalls: Don’t Use Tape in Shallow Seams

One word of caution: Do not use bond breaker tape in shallow seams. When there isn’t enough depth, the tip of the caulk gun is more likely to lift the tape during application, pushing it against the seam walls and compromising adhesion. We've seen firsthand how this can cause widespread seam failures, most notably on a high-end carbon fiber sailboat where incorrectly applied tape contributed to a complete failure of the caulking system. It was an expensive mistake that could have been avoided with proper installation practices.


Choosing the Right Tape

Not all tapes are created equal. We recommend (and use) Scotch® #218 Fine Line Tape due to its superior adhesive properties and reliability. carbon-fiber sailboat, where improperlyfor its superior adhesive performance.  A roll of this tape can even double as a hand tool for pressing tape into place. Once the roll is empty, the smooth plastic core makes an ideal tool for flattening tape into the bottom of seams, ensuring a clean, consistent application.

carbon-fiber sailboat, where improperlyfor its superior adhesive performance.

Does It Really Work?

Absolutely. We've seen many cases where bond breaker tape made a clear difference. In one example, a worn section of deck showed the caulk had separated cleanly from the tape at the base of the seam, while remaining firmly bonded to both sides, as it should. That kind of performance confirms what we already know: when used correctly, bond breaker tape adds real value.


In summary, bond breaker tape is a small addition to your deck caulking process that delivers significant benefits: stronger seams, fewer failures, and a longer-lasting deck. Just be sure to use the right depth, technique, and product.


ALL PRODUCTS

February 13, 2026
For that reason, you want to start by discussing the project with the service manager at the yard that normally services the boat. In that discussion, you will want to learn the following: Is there a shed or watertight tent large enough to enclose the project, or is there another solution for preventing the weather from causing damage or delay? If the boat is hauled, can it be staged with scaffolding for safety, if necessary? Does the yard have qualified personnel to perform the necessary tasks? These include: Properly protecting the boat's surfaces from damage during the refit. Removing any deck hardware that is in the way, this may require taking down headliners or removing interior trim to access the fasteners. If a replacement teak deck is required, can and how will they remove the existing teak without damaging the rest of the vessel, including the structural deck beneath the current teak deck? After removing the existing teak, are they qualified to inspect and make any necessary repairs to the structural deck? On fiberglass boats, damage may appear as soft spots due to compromised structural core material. In some cases, on metal vessels, it may be necessary to replace damaged sections of plating. Do they have marine carpentry skills to properly final fit and install the new modular teak deck system? With the new deck installed, do they know how to reinstall the deck hardware properly and, if a sailboat, install and tune the rig? Are they capable of re-commissioning the vessel and any systems disabled during the refit? What is the proposed schedule and timeline for the refit? What is the estimated budgetary cost, and which of these costs can be assured? If the yard is not a suitable fit for the project, can they recommend an alternative solution?
MPS 4000 product on deck
July 31, 2025
Get answers to common questions about MPS 4000, including cleaning tips, cure time, clamping advice, compatibility with SIS 440, and best-use practices.
May 26, 2025
Can I touch up sunken caulk after it has been applied incorrectly? Yes, you can apply additional caulk over areas that have settled after the initial application. Best Practices for Re-Caulking: 1. For Older Installations: If the existing caulk has been in place for an extended period and has fully cured or “seasoned,” it is best to prepare the seam before applying more caulk. The recommended method is to cut a shallow “vee” (V-shaped groove) into the existing seam. This increases the surface area for better adhesion. After veeing the joint, thoroughly wipe the area with a clean rag soaked in acetone, then apply the new caulk. 2. For Newer Installations: If the caulk was applied recently (within a week or two), the surface is still fresh and may not require veeing. In this case, simply clean the area with acetone and apply additional caulk directly over the low or settled spots. General Reminder: Regardless of the age of the installation, always clean the surface with a rag soaked in acetone just before applying new caulk. This ensures a clean, contaminant-free bonding surface and helps the new caulk adhere properly.
ALL ARTICLES